Generating Momentum: Analysing Australia's Attack
The mystique surrounding the once marvellous attacking exploits of Wallaby teams gone by seems to have disintegrated over the last four years, with fingers pointed at individual players and coaches alike. Professional coach and rugby analyst Graeme Forbes take an in-depth look at what is stunting the Aussie attack, and why it's a relatively simple fix.
When I was growing up Australia were one of the most exciting teams to watch. They revolutionised Rugby with their flat attack and quick passing and it rightfully took them to two World Cups in the 90’s.
The concept was simple, if you start flat you’re closer to the gain line and it’s easier to get over it. This was, however, before the introduction of Rugby League style defensive systems, when Line speed was barely even in Unions vocabulary and defences simply had little more than two options, Man on Man or Drift. T
Clive Woodward mentioned in his biography how, when he played for Manly in the 80’s, he was amazed by the Australian teams flat alignment. He recounts how during one game when on defence the opposition midfield had almost the same flat formation as the defence and stood right up in their faces.
That team was a Randwick side that would likely have contained the likes of Michael Cheika and England’s very own Eddie Jones. Randwick are a club that’s dominance in the 80’s and early 90’s was built around innovative back play, of which the flat attack was born.
Australia’s current attack coach Shaun Berne is another glorious product of the Randwick brain trust and anyone with a passing interest in Rugby will not have missed the fact he brought the flat attack back to the spotlight this year with the Melbourne Rebels.
It was relatively successful for the Rebels who were Australia's most exciting attacking side. So when Berne came on board it was a no brainer that the flat attack was always going to make an appearance with this year’s crop of Wallabies.
But, there is a long standing misconception in Rugby about what the flat attack has become in the modern game. Whilst it’s true you play right up in the face of the defence putting them under pressure, the belief in this day and age that you can do so with little to no momentum behind it is erroneous to say the least.
In the days of dominant hits playing flat requires you to execute on the tackle line, to runners with depth and tempo behind them. It is about generating momentum and against South Africa the Australian’s struggled for momentum, the flat attack constantly playing into the Bokkes brutal hands.
Let’s jump into the game and look at a few moments that demonstrate this.
Phase One Attack (was a big issue for Australia).
How a team begins its attack sequence is really important, be it first phase or transitioning from defence to attack post turn over/kick receipt.
We’re going to focus on their launch plays because here I think Australia got things wrong, consistently playing off the top and the flat ball off Foley only to see themselves hit back constantly.
There is nothing wrong with that flat ball as a concept. The idea is to get the ball carrier over the gainline quickly and create momentum and a target for your second wave to hit. That in turn should give you fast ball so you can attack a hopefully misaligned defence .
It’s Rugby 101
The issue is that defences are now so quick off the line that putting an extra pair of hands into the process, in this case Foley, allows the tackle line to beat you over the gain line.
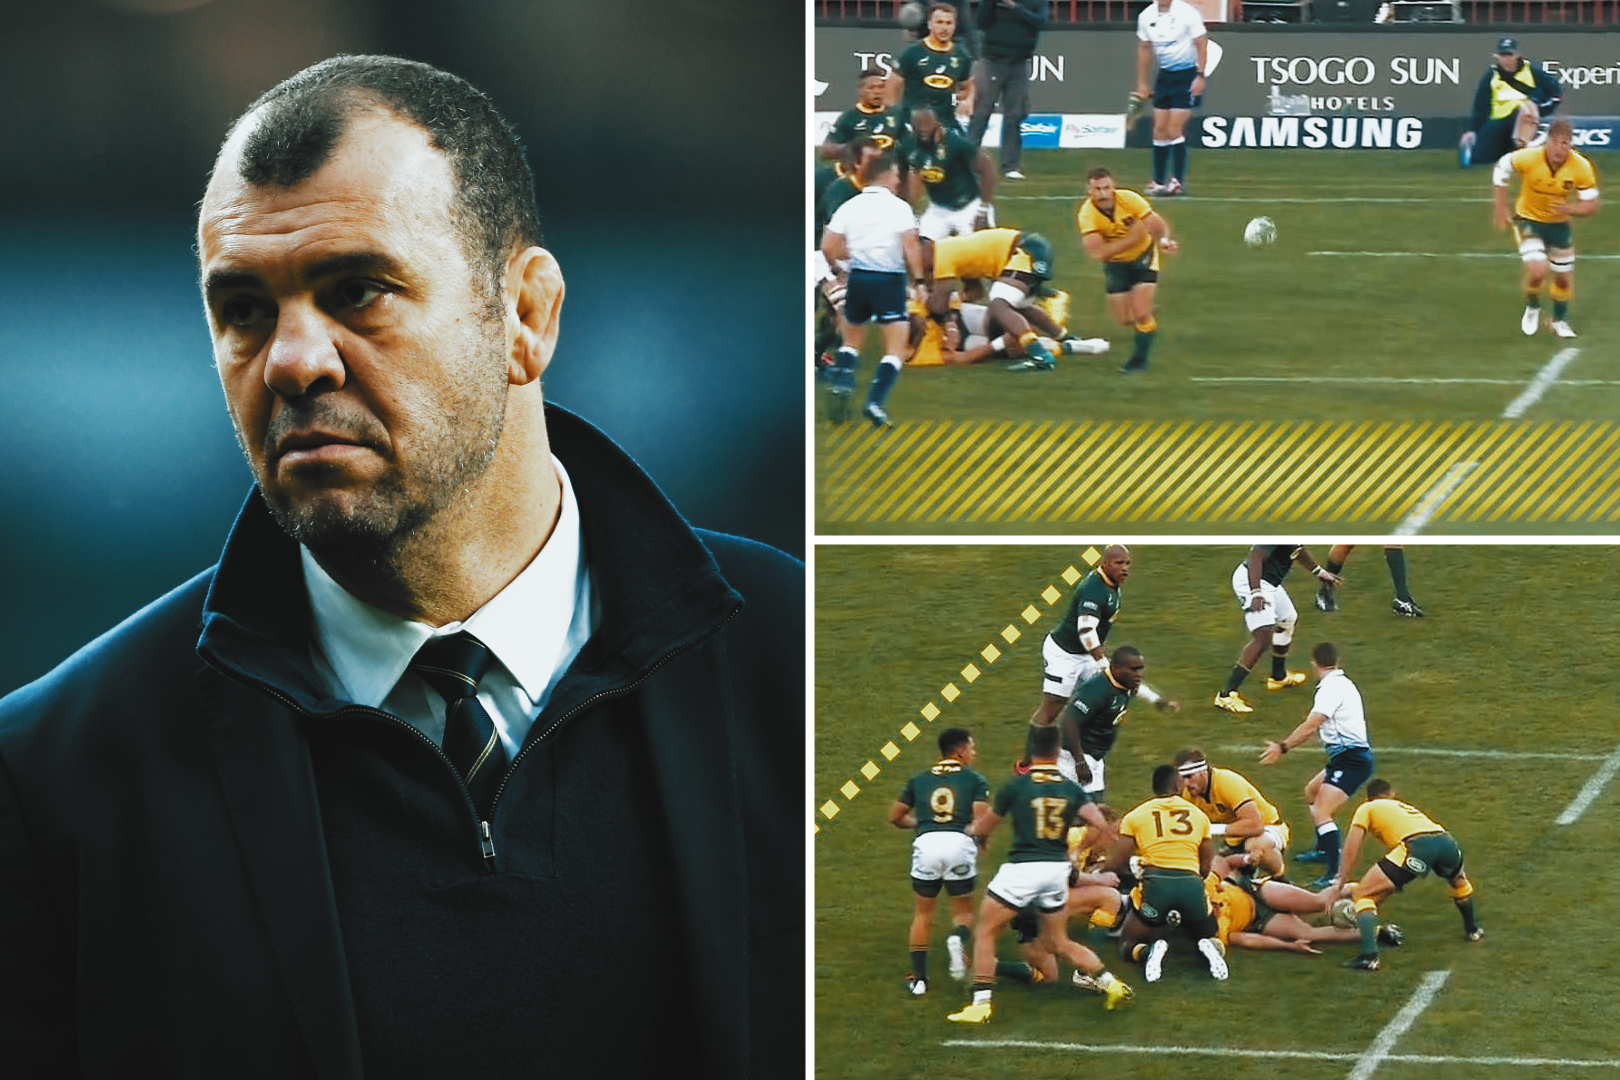
So how you start the sequence is absolutely key so let's look at this launch play off the games first line out.
Australia play off the top at the front, whilst it’s a good win, it is not the best place to launch a play from.
First of all, we can see White is on the 5m line, he is in no way a threat to Louw and the tail of the lineout, they can ignore him straight away.
Secondly throwing to the front keeps all the South Africans live and in the defensive line, as the ball comes down they simply pour through.

They are on the open side of the attack, and already well up over the gain line - which as we can see below cuts off the seam between the lineout and the 10 as a carrying route.
Foley carries up but when he flattens out to link with Kuridrani on the burst we can see they are well short of the gain line and barely get back to it.
As we can see in the full gif below, that bounce out gives Esterhuizen a clean shoulder hit on Kuridrani and he’s stopped before the gainline
Straight away they have lost the momentum. This instantly means Australia are working their attack in negative space (i.e. their side of the gain line) which when you’re trying to play flat is a problem
A better play here would perhaps have been throwing middle or back.
This would have removed the Bokke Forwards as a defensive threat, they would have had to come back and around anything over the gainline, slowing their advance enough to exploit it.
The second piece of the puzzle is why play through Foley at all? If you’re trying to get over the gain line why not just hit Kuridrani, or another player coming at tempo, quickly and directly off 9? He is then already up and over the gain line and you’re working in the oppositions space?

If we look we can see how shallow the Australian pack is on the ruck, it’s not needed this time as Kuridrani is able to place the ball cleanly but should they be required to hit the ruck they are coming from the side and with little velocity with which to make an impact.

We’ll see this constant lack of depth come back to haunt Australia later on.
Australia snap back off the ruck to attack the blind side and straight away we can see how poorly set up to attack they are against a very compressed South African defence.
There is space wide and Fainga is frantically signalling it, but that late change of direction from White allows the South African defence time to adjust and means visually Foley doesn't want to risk that pass.
It’s easy to criticise Foley for not seeing the wide ball but what he’s expecting to see is a very different picture from the one given by his attacking side. He has no hard running option and no backdoor option sliding around to attack the edge and simply doesn’t see the wide pass until it’s been closed off.
So with Elstadt in his face he understandably does the right thing and holds onto the ball himself.
Again though, it’s a late decision and with little momentum in his run Australia again lose ground. White plays the same way and Australia again fail to get to the gain line.
What Foley needed here was someone coming hard and at pace on his outside shoulder attacking the space between Elstadt and Jantjes. Flat late passing under pressure.
The second issue here is even though they are retaining the ball, which is fine, they are constantly going backwards, giving South Africa targets to hit. As Australia come back open again they are met by a swarming Bokkes defence that is slowly but surely gaining them ground.
Next we see the Australian pod System breaking down (below).
Slipper is the apex but is deep and static:

If slipper pushes up a few more yards and plays static it will make the bokkes defence hold on him and straight away the pod gets some depth.
Instead this lack of depth in the pod allows the Bokkes to keep moving up and while Arnold gives him a good tip on option he halts his run it’s deep and is non-threatening.
Kerevi is the back door option but again look how flat his is in comparison to Arnold who is his screen. Because of this his run ends up being lateral and the Bokke have an easy decision to swim past Arnold and bury Kerevi.
Australia come left to Foley where we see he is given no shape to exploit. No one coming from deep at pace and no one giving him an option to play out the back.
We can literally see him look out, look behind and then go himself. Sure Hooper comes around late, but Kreil is already in that space and the moment is gone, Foley’s already operating under pressure and again does the right thing and carries himself.
The result is Australia again lose ground.
As Australia play with the flow and Banks carries into contact we can see Australia still haven’t made it back to the gain line (Yellow Line).

As the play continues and Nick White runs the phases the Australian carrying pods have almost no depth to them with cleaners and support over shooting first Hooper and then as Kerevi takes the ball in behind from Arnold we can see Fainga has again overshot him meaning Kerevi takes the contact.
It’s great strength and a wonderful offload from Kerevi to get the ball away and Fainga reacts well but in going for the blind offload causes play to break down right back where Australia launched their attack.
Seven phases and Australia have been battered, lost territory and lost the ball. Better attacking shape would have allowed Australia to weather that pressure and build some momentum.
Now obviously some of this is the speed of the South African defence, watch how they repeatedly come from behind the rear foot, so they have a running start on defence instead of hindmost alignment and having to gain momentum.
There is also a train of thought about sending one of the cleaners into contact first to block defenders and stop them getting a clean second hit, but that’s only as good as the initial carry and even if that is the case here it’s adding no benefit to Australia's attack
These same problems appeared time and time again throughout the game.
In the lead up to the first South African Try, we again see this lack of depth and attacking structure play directly into South Africa’s hands.
Australia play off the top and again do so from the front.
Watch Foley play a “fast” flat ball into Hooper, who he then loops around to take a circle ball, promptly getting levelled by Esterhuizen.
First up the move just makes no sense. As we’ve already discussed off the top from the front does nothing to negate the Bokke forwards and keeps them alive and in the defensive line.
Secondly Hooper is attacking Jantjes. Hooper is one of the most physical and powerful ball carriers in the Australian team (if not the world), Janjtes for all his strength is not the strongest defender. So why you would play around the back like this straight into South Africa's heaviest hitters is confusing.
Also notice how deep behind the gain line this is executed? Why not just hit it up off 9?
A middle or tail ball off the top, played directly to Hooper with either the hard carry or the screened pass behind Kuridrani to a looping Foley might make sense, but everything is executed so flat the South Africans were always going to be in among the Australians as they tried to do so.
Nic White tidies up and does well to have a little dart.
Then off the next ruck a really poor pod formation from Australia plays into South African hands.

Kepu is in a great position, look how flat he is to the opposition defence, a little tip on pass to a hard runner from here will cause a lot of damage. But look at his left and right options and how flat they are.
Their ineffective carry and then clean comes from lack of momentum. With little depth on the pod playing this inside ball gives them little momentum and Fainga’a struggles to make an impact. Some depth would have allowed him to burst onto the ball and allow Salakaia-Loto to follow through on the hammer or clean with some impetus.
Instead he’s past the clean before they even get Fainga’a to ground and Louw is patient and gets on the ball and the steal is good.
Lighting reactions from Jantjes at 9 sees the Bokkes play to the space and the rest is history.
I think Kepu’s better option here would have been to play the outside tip on and Fainga’a comes through to support Salakaia-Loto.
The definition of insanity is doing the same thing over and over again and …. well, you get the point. Australia didn’t learn and repeatedly used this attacking option off the line out. We see it at 21:36, 43:43 and here at 58:43 we see exactly how ineffective it is.
Front ball, off the top, White fires midfield to Foley.
Watch how the Bokkes backrow just pour out into the midfield.
They play around the corner and... fail to get to the gainline, twice.
They recycle and go again and are stopped behind the new gainline:
Finally a beautiful flat pass from Toomua frees Hooper who passes inside to Kerevi who is bundled into touch right back where they started.
It’s astounding that no in game analysis picked this up and told them to change the launch plays.
In Stark Contrast
In contrast let’s watch South Africa’s Second try and see what early phase momentum does for a side.
Scrum Ball, Kriel carries straight off 9,
SA are straight over the gain line, PST carries of the quick ball but look at the depth he comes from and glides through the gap.
Puts in a chip that Russel Earnshaw would be proud of. Jantjes regathers and the Bokkes pummel Australia into submission. With De Jager going over.
Again at 66 minutes, we see a similar launch play give them all the momentum they need. Steyn carries off 9 and is straight over the gainline, PSDT carries on the next phase smaking bags of yards and the sequence is only stopped by a potentially serious injury.
Off the ensuing scrum, they do the exact same thing with much the same results..
Now let’s look what happens when Australia get it right
The lineout is again at the front but that catch and set pulls all the South African pack in:

Which allows Hooper to get well over the gain line:

This in turn robs South Africa of their line speed and instead of a thick wall of backrow and midfield coming up Steyn and Kriel are on their own and Foley and Toomua can attack man for man - Foley plays a flat pass to Toomua at pace into the gap and he’s even further over the gain line:
Genia plays the flat pass to Beale who shatters the gain line and Foley tracks him to score.
All that comes from attacking with momentum, flat attack all present and correct because players were coming from deep and hitting the ball on the tackle line.
Playing away from home is always difficult, but South Africa at Ellis Park? That’s a different kind of difficult altogether. Regardless heading into this game the Wallabies would have been confident of giving a good account of themselves and this will have been a humbling experience for them.
The good news is that it’s all easily fixable, get some tempo runners over the gain line and their attacking structure will create its own depth to move in and this flat line attack will be able to get off the mark and running.
![]()
Filed under:
International, Rugby Championship, Match Analysis, Australia
Written by: Graeme Forbes
Follow: @thedeadballarea · @therugbymag